Lament is one of the most challenging dungeon in Remnant 2 with a lot of puzzle that need to be solved carefully in order to protect a valuable piece of armour gear. Lament is one of Remnant 2’s most difficult dungeons. It has a variety of puzzles that, for those with the cunning to solve them, conceal worthwhile prizes. While there are many demanding spots in Yaesha that could result in a successful campaign roll, Lament can still be tough even for seasoned players. By taking a methodical approach, you can utilise dungeon hints to solve these puzzles. Remnant 2’s Lament dungeon can be found in Yaesha’s Faithless Thicket area, though keep in mind that locations can change at random depending on your campaign roll. The Twisted Chantry’s entrance and the Forbidden Grove’s Kaeula’s Rest exit are two locations where some players have found the Lament. Like the goddess Nimue, there can be a rotation between the dungeon’s locations.
In the Lament, the first “puzzle” you’ll find in Remnant 2 is a narrow hallway with arrow slots in the walls at the beginning and end of the passage. Lines of arrows fire on the left and right every couple of seconds, and you have to jump over a small ledge. To avoid getting hit by the arrows, you have to move from side to side and time your jump over the ledge just right.
There are two more hallways to go through. The next one has a low roof that your character has to crawl under to get through. In the last tunnel, there are places to crouch, ledges where arrows shoot vertically, and the same wall slots that shoot before. Learn when to press the arrow keys to carefully move into these areas. This will lead you to a lever that opens a door that leads deeper into the Remnant 2 cave.
The Symbol Dial Puzzle Solution
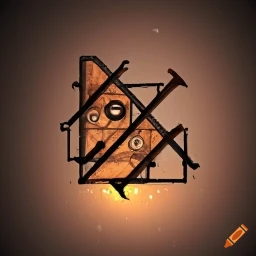
There are many graves in this room. There are different signs on the wall above the graves. The coffins themselves are wrapped in coloured cloth and hold mummified Pan priests. Write down what colour cloth is over the Pan priests. Find a book on the middle ramp. Note the coloured picture that you can find in the book. This design can be seen on the cloth that the priests are wrapped in. Find four of the right-colored coffins and write down the marks that are on the wall above them. Some seeds of this dungeon put the rest of the skeletons on the second floor. To get there, you’ll have to clear out most of the dungeon. Find the Dial Puzzle and line up the four symbols with the middle point in any order. The door that leads deeper into the basement will now be open.
After this door, there will be a stop. The Blood Tinged Ring is just past it. One more thing is that you will fight the Abberation Wither. Beat Wither, and the Overdrive Mutator will fall to the ground. There should also be a box with Kolket’s Razor inside it. To get the Nightweaver’s Grudge Amulet, you can bring Kolket’s Razor back to Yaesha and give it to the Nightweaver Web. However, you’ll need to inspect Kolket’s Razor to get Kolket’s Key, which you’ll need for the Invisible Bridge puzzle.
Red Widows’ Coffin
Go back to the checkpoint closest to Wither before going back to the Invisible Bridge. There should be pots in a small room. You can drop off to a small corner if you dodge towards the pots. You’re going to land in the sewage. To get into the ditch, follow the water and crouch down. The Supply Room Key is near the end of this. This key will open the locked door in this room. This will take you to a road that is full of Saw Traps.
Be careful here, because the saws will kill you right away if they hit you. But it’s not really that hard to beat. As the big saw on the left comes closer, time your dash forward so that it moves away from you. Then, as you walk past the raised platforms, switch to the right, and on the next one, switch back to the left. Make sure you stay close to the middle so that the horizontal saws don’t hit you. You can also get help from the Black Cat Band or the Challenger’s Die Hard perk. Once you get past these traps, you’ll find yourself in a fancy room with a single coffin in the middle. Get the Red Widow Set by taking things from this box.
After going down the other road we didn’t go down earlier, you’ll reach the Invisible Bridge Puzzle. There will be poles that look like they’re floating and plates on top of them. There are marks written on the plates. The first pillar has writing on it. Look at all the other pillars that have the same sign. One support should connect to the other with an invisible platform. To be safe, you can use bullets to shoot at the air between the poles. You ought to be able to leave bullet holes in the air if the unseen bridge is there. When you get to the last wall, you’ll have to jump over the last gap. To open the locked door, use Kolket’s Key.
There are four coffins behind this door that hold riches, one of which is the Ring of Diversion. Try to find a wall that has red particles on it. You should be able to walk past this fake wall. When you reach the ledge, follow the path and jump off of it. You’ll land on a box with ropes around it. You can find the Lodestone Crown here. It’s a nice headpiece that gives off a blue glow. If you wear the Lodestone Crown and talk to Bedel of the Vauunt somewhere else in Yaesha, he will give you the Lodestone Ring.
How to Find Kolket’s Razor and Kolket’s Key
The path that leads from the Symbol dial should lead to two more graves. One of them will start a fight with a tough Wither enemy that will give you the Kolket’s Razor quest item once you beat it. When you deal with the Razor, your character will also get Kolket’s Key, which is a hidden part of the item. It is imperative that you make use of the checkpoint located here in Remnant 2 in order to unlock a fast travel point that is located halfway through the dungeon. This secret device will become significant at a later time.
Floating Pillars Puzzle Solution
The other main puzzle in The Lament is made up of several pillars that float in the air above a huge hole that looks like it can’t be crossed. Below the part of the Remnant 2 dungeon where the dial puzzle was, you can find this place deep underground. As you go down the stairs to the chest at the bottom, each pillar has a different sign carved into it.
The jumps won’t go far enough to reach the pillars, but some of the rock shapes are linked by invisible bridges. To see that the farthest right column has a path, fire at the area that leads to some of the first rocks. From here, find the other pillars that have the same sign as the first one. They are all connected by secret paths that will lead you to the end of the puzzle.
When you get back to the halfway point, break the vases in the corner of the room to find a secret place below the floor. The path below leads to a wet area with a hidden passageway that leads past a small waterfall. The glowing red item you see this way is the Supply Room Key, and it can be used to get into the Supply Room at the end of the road above the waterway in Remnant 2.
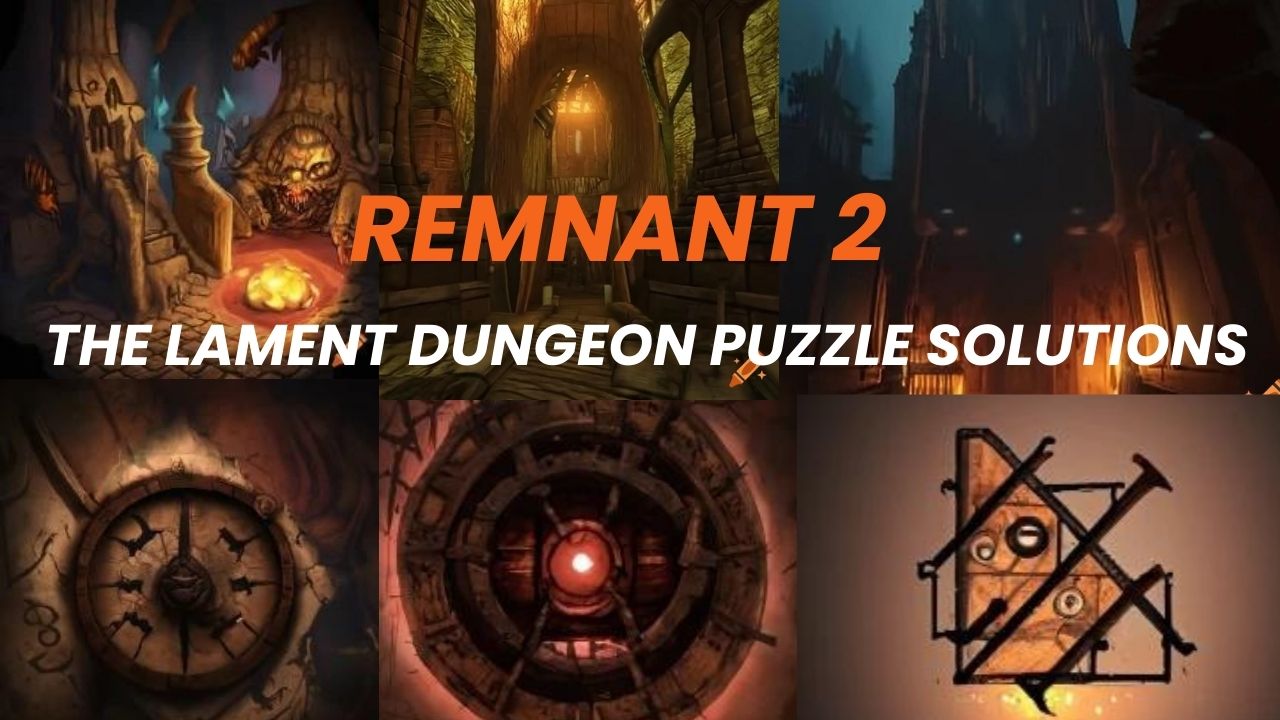
In Remnant 2, you can find the Hidden Blades puzzle by going through a hole in the Supply Room and turning left into a long hallway lined with saw blades. Along the right, left, and top of the path, these sharp instruments cut patterns. Your character needs to move carefully in the middle while avoiding the blades in the middle. The last altar in the dungeon is where this “puzzle” ends, and it has a powerful prize.
Rewards From The Lament Dungeon
From the final rock formation, one can leap to the door located at the terminus of the floating pillars; however, it is inaccessible without Kolket’s Key. The Room Beyond the Door contains a sizable chamber where the Ring of Diversion is positioned atop a coffin as an incentive. This item grants an extended period of invulnerability while gliding and evading, a quality that pairs exceptionally well with the concealed Invader archetype class in Remnant 2.
You can find a hidden stairwell that you can get to through a secret wall on the left side of the room by rolling into it and falling off a ship that is hanging from the ceiling. This is where you can get the Lodestone Crown, a helmet that lights up dark areas. Because of this, it’s a great tool for brave travellers of Yaesha in Remnant 2.
You are brought to an altar after completing the Hidden Blades riddle, where you must gather every piece of the Red Widow Armour Set. This armour of average weight offers a moderate level of protection against foes due to its high resistance to blight and fire. Those who complete every puzzle in The Lament Dungeon of Remnant 2 will have the opportunity to acquire the Red Widow armour.